Maya
Overscan for Arnold Settings – Method 1 (from Autodesk Notes):
Overscan extends the render region beyond the regular image coordinates. It can be either a percentage or a pixel value. You can mix % and pixel values at the same time, however, if you don’t specify the unit it will default to pixels. It can have:
- One value such as 10px to specify an equal margin on every side.
- Two values, such as 10px 5px, to specify the top/bottom (first value) and right/left (second value) margin.
- Three values, such as 10px 5px 2px, to specify the top (first value), right/left (second value) and bottom (third value) margin.
- Four values, such as 10px 5px 2px 1px to specify the top, right, bottom, and left margins respectively.
E.g. a ten-pixel overscan for a 640×480 image in all directions can be achieved with options region_min_x, region_min_y, region_max_x, region_max_y of -10, -10,649, 489. The example below shows a pixel value of 10, 50, 100, 200 (top, right, bottom, left) in the ‘Overscan’ field:

Overscan for Arnold Settings – Method 2
Input overscan values to Render Settings > Image Size

Overscan by 10% in all directions example:

1920 *10% = 2112
1080 *10% = 1188

also change the Camera Attributes >> Camera Scale from 1 to 1.1
John Mather (Next Design) Maya Batch Rendering Work Around
Sometimes an old Maya project will not batch render correctly (It might render and yield black frames). But the interactive render works normally. This script will allow you to render out a range of frames (you set the start and end frames) and write to your specified directory through the interactive renderer. Thanks John Mather. This script has helped me out many times:
// Batch rendering workaround V4 - John Mather (NextDesign)
// Author page: http://www.creativecrash.com/users/john-mather
// Check for updates here: http://simplymaya.com/forum/showthread.php?p=318227
string $filename = "render";

int $startFrame = 3;
int $endFrame = 24;
int $nFramePadLength = 4; // eg name.0000.ext (4 zeros)

string $directory = (`workspace -q -rd` + "images/");

// check for render panel. Found here: http://www.creativecrash.com/forums/mel/topics/error-object-not-found-renderview
string $renderPanel;
string $renderPanels[] = `getPanel -scriptType "renderWindowPanel"`;

if(size($renderPanels))
    $renderPanel = $renderPanels[0];
else
{
    $renderPanel = `scriptedPanel -type "renderWindowPanel" -unParent renderView`;

    scriptedPanel -e -label "Render View" $renderPanel;
}

// get the image format in the render globals
int $format = `getAttr "defaultRenderGlobals.imageFormat"`;
string $extension = "";

switch($format)
{
    case 0: $extension = "gif"; break;
    case 1: $extension = "pic"; break;
    case 2: $extension = "rla"; break;
    case 3: $extension = "tif"; break;
    case 4: $extension = "tif"; break;
    case 5: $extension = "sgi"; break;
    case 6: $extension = "als"; break;
    case 7: $extension = "iff"; break;
    case 8: $extension = "jpg"; break;
    case 9: $extension = "eps"; break;
    case 10: $extension = "iff"; break;
    case 11: $extension = "cin"; break;
    case 12: $extension = "yuv"; break;
    case 13: $extension = "sgi"; break;
    case 19: $extension = "tga"; break;
    case 20: $extension = "bmp"; break;
    case 22: $extension = "mov"; break;
    case 30: $extension = "pntg"; break;
    case 31: $extension = "psd"; break;
    case 32: $extension = "png"; break;
    case 33: $extension = "pict"; break;
    case 34: $extension = "qtif"; break;
    case 35: $extension = "dds"; break;
    case 36: $extension = "psd"; break;
}

// start the progress bar
global string $gMainProgressBar;

progressBar -edit -beginProgress -isInterruptable true -status "Rendering..." -maxValue $endFrame $gMainProgressBar;

for ($i = $startFrame; $i <= $endFrame; $i++)
{
    // check for user termination
    if(`progressBar -query -isCancelled $gMainProgressBar`)
        break;

    currentTime $i;

    renderWindowRender redoPreviousRender renderView;

    // pad the frame number
    string $framePadded = $i;

    while (`size($framePadded)` < $nFramePadLength)
        $framePadded = ("0" + $framePadded);

    string $concatFilename = $directory + $filename + "." + $framePadded + "." + $extension;

    if (`getApplicationVersionAsFloat` >= 2011)
        // Thanks to nowayfra on creativecrash for his workaround
        catch(eval(renderWindowSaveImageCallback ($renderPanel, $concatFilename, `getAttr defaultRenderGlobals.imageFormat`)));
    else
        renderWindowSaveImageCallback ($renderPanel, $concatFilename, `getAttr defaultRenderGlobals.imageFormat`);

    progressBar -edit -step 1 -status ("Rendering frame " + (($i - $startFrame) + 1) + " of " + (($endFrame - $startFrame) + 1)) $gMainProgressBar;    // update the progress bar

    print ("Saved " + $concatFilename + "\n");
}

progressBar -edit -endProgress $gMainProgressBar;    // clear the progress bar

print ("Completed rendering of " + (($endFrame - $startFrame) + 1) + " frames.\n");
Setting up the Maya Camera

Instead of using a camera rig with parenting just set the rotate order to zxy (this will have z be the child of x and x be the child of y) and the Axis Orientation to Gimbal (double click the rotation icon in the tool bar to access). The Y will control your pans and the X will control your tilts and the z will control the oblique angle or “Dutch Tilt” and your channel box rotations will not get messed up.
Light Color Mapping
You can obtain some unique color lighting effects by mapping 2D Texture Ramps, 2D Grid Textures, or Images (Gobos) into a light’s Color Input. In this example using an Arnold Area light: You can apply a 2D Texture Ramp node into the light’s Color Input and create a circular ramp. This will act as a conceptual spot light with falloff control and color control.
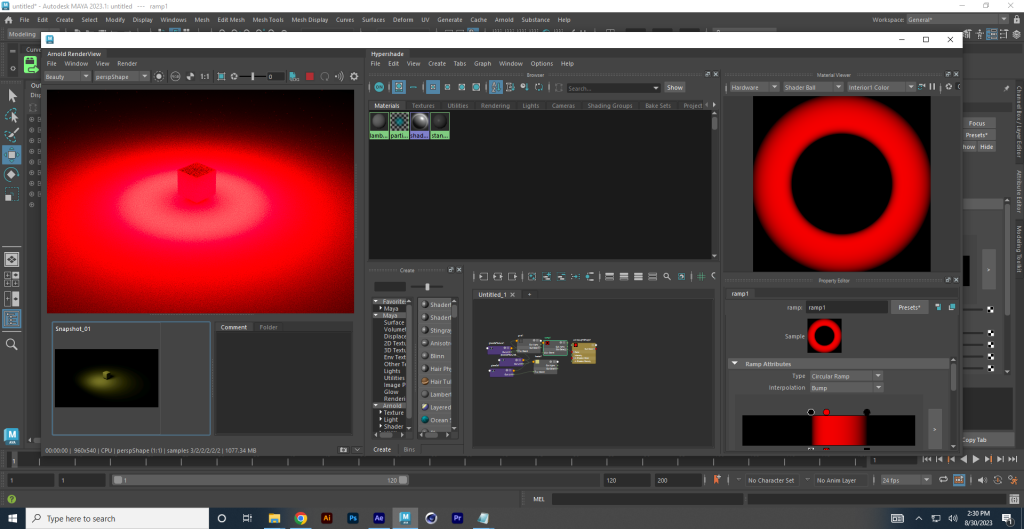
You can also assign a 2D Fractal node to the color and adjust the Color Gain and Default Color so that the light will create “blotches”. If adjusted subtly, this can introduces a scale factor and vibrant irregularity to a cast light. You could also simulate multiple lights by mapping a 2D Grid texture to the Color Input. Lastly, pipe your Black and White gobo images into the Color Input to add additional theatrical lighting effects.

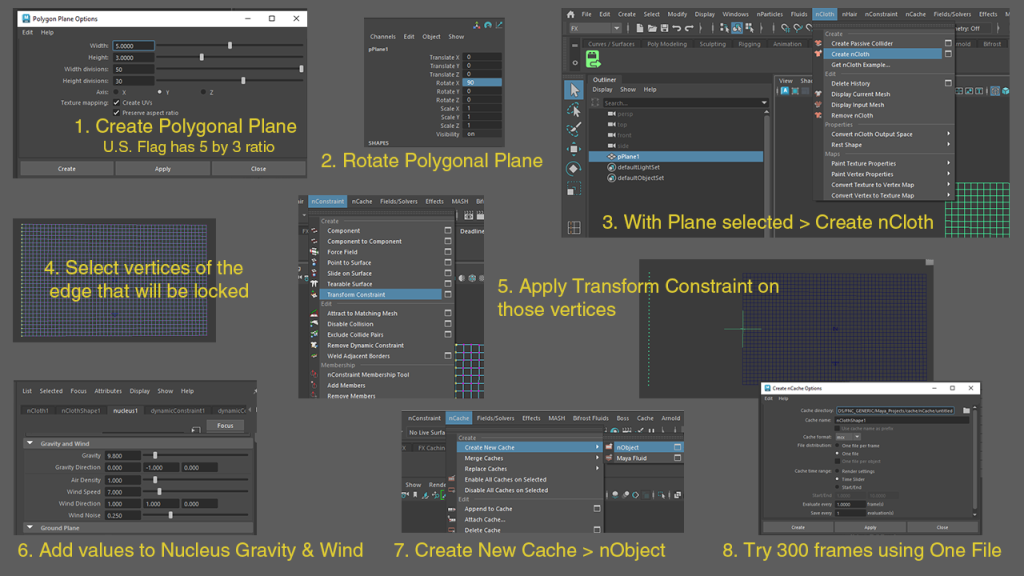
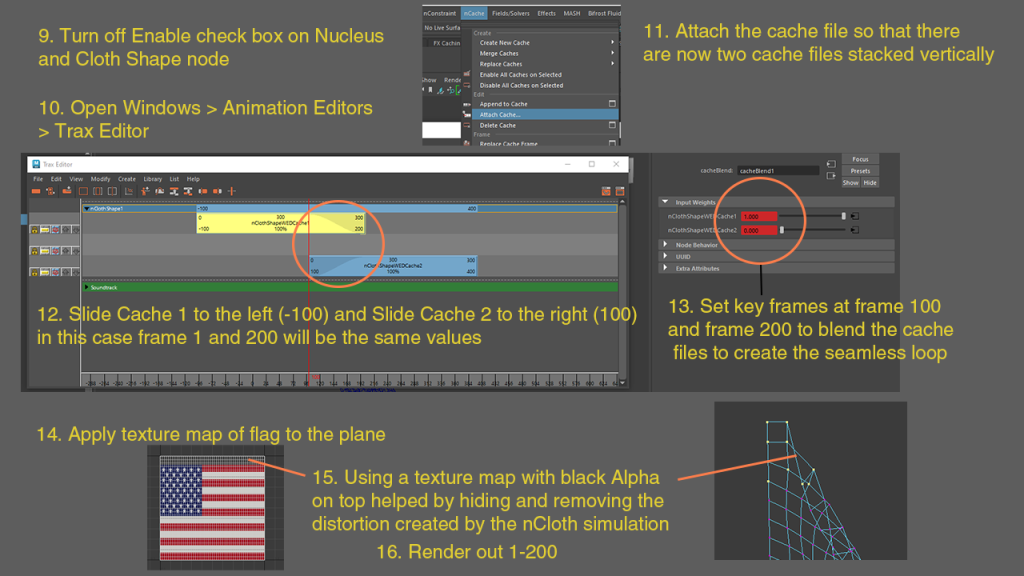
Seamless Flag Loop with nCache Blend Technique
Below are screen captures with steps on how to setup a seamless flag loop. This is for a 200 frame loop. After the render, I slow the sequence down (4 times slower) in After Effects and the motion is very passable and not too frenetic for something like an anchor BG. I found that increasing the polygon count in the initial plane geometry and going for something longer than 200 frames makes the cache files buggy. Maybe that is just my hardware – but it seems in the last few years Maya is really unstable and filled with bugs.